


How to Finish a Needlepoint Ornament
Supplies
- Finished needlepoint round
- Polyester, cotton, or wool batting (about 1/8 inch thick)
- 1/8 inch thick acid free foam board*
- Backing fabric
- Skein of floss (about 28 yards) OR about 18” of cording
- Heavy duty thread matching your backing fabric or cording
- Tacky glue
*I’ve switched to using and teaching finishing with acid free 4 ply mat board instead of foam board. I love the way foam board looks but find it more challenging than necessary to sew the back and the front together. Precut mat board shapes are available here! Large pieces of foam board and mat board can be found at stores like Hobby Lobby and Dick Blick Art Supply. If you like the thickness of the foam board but prefer the ease of finishing with mat board - simply add an extra layer or two of batting to the inside of your ornament.
Tools
- Scissors
- Exacto knife
- Block of fine sandpaper
- Lots of pins
- Needle (preferably a curved needle)
- Pen
Instructions
Before starting you may want to stitch an extra two to three rows of tent stitch around the design area, using your background thread. This ensures no white canvas will be seen around the edges when the ornament is finished. It’s also helpful when your design elements fill the entire ornament. A bit of the stitching is lost around the edges when you pull the canvas over the ornament base. So if there is an important design element like a date, name, or detail you love that’s close to the edge, definitely consider this step!
1. Begin by cutting the acid free board into two circles a quarter inch smaller than your needlepoint round (It’s helpful to draw the circle onto the board using some round object, like a glass. Even if the circle is not the correct size, it helps to have a visual when cutting).
Cut two circles out of the batting using the board circle as a guide.


2. Cut off the excess canvas, leaving 3/4” around the design. Make small cuts from the outside of the canvas circle towards the stitching. Cut within an 1/8th of an inch of the stitching. Space these cuts 3/4” apart.

3. Flip the canvas over so the wrong side is facing up. Create a sandwich by laying the batting on top of the canvas and the board on top of the batting.

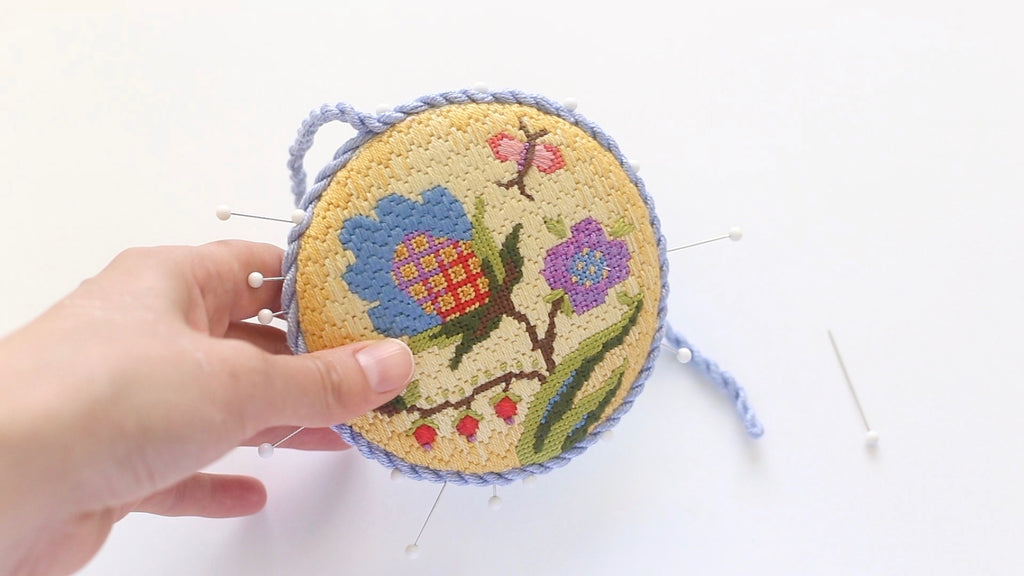
Pull a canvas tab up around the batting, the side of the board, and to the back of the board. Sink a pin through the canvas and into the side of the board.


Turn the sandwich 180 degrees and repeat. You will have two pins at opposite sides of the circle. Repeat with two more pins so that all four “sides” are pinned. Then fill in between the pins with more pins, turning the circle 180 degrees each time you sink a pin (this ensures that the canvas is being pulled over the board evenly). TIP: don’t be afraid to pull the canvas tabs firmly! Canvas is strong and it’s important to get the design to wrap around the sides of the board.


4. Squeeze a good dollop of tacky glue onto the board. Pull the canvas tab tightly around the batting and board, then glue firmly to the board, holding it briefly in place to let the glue bind. Place a pin through the canvas and into the board. Repeat all the way around the circle. The canvas tabs will overlap.

Let dry completely then remove all the pins.

5. Iron your backing fabric. Using the second board circle as a guide, cut the fabric into a circle 3/4” bigger than the board all the way around. Make small cuts from the outside of the fabric circle towards the board. Cut within a 1/4 of an inch. Space these cuts 3/4” apart.


6. Create another sandwich by laying the batting on top of the fabric and the board on top of the batting. Repeat step 3 with this second fabric sandwich.
TIP: unlike canvas, fabric is malmble and much more delicate. There is no need to pull and tug like you did with the canvas. The goal is just a smooth and unwrinkled surface.


7. Repeat step 4, however it is unlikely you’ll need to pin the fabric down once glued. Fabric binds much faster than canvas. I like to glue down every other fabric tab, then go back and glue down the rest. I find this helps keep the fabric smooth and even.


8. Once dried, mark the top of both sandwiches with a pin.
Most fabrics have a grain. I like the grain to run horizontally across the back of the canvas. Look closely at the grain lines (or warp and weft) and choose the top of the round accordingly. NOTE: felt does not have any type of grain or warp and weft. Twill runs on a diagonal. So play around with the sandwich until you like the way the fabric looks at a certain position, then mark the top accordingly.
Leaving an inch and a half at the TOP of the round, glue around the edges of one of the sandwiches. Place a dollop in the center as well.
Take your second round, and glue them together, matching up the marking pins at the top.
It can be helpful to place a weight on top of the ornament as the front and back dry together (like a few books).
10. While the ornament is drying, create the cording. I'm going to show you how to make a cord without a cording maker but I highly recommend using one! They make the whole cord making process much easier. This one is my favorite.
NOTE: You can buy cording. Your color choices will be limited but I’ve found great cording at my local fabric/craft store. If you’ve bought some (about half a yard will be plenty) then skip this step.

Cut the skien of floss into long lengths of 80” and place together. 


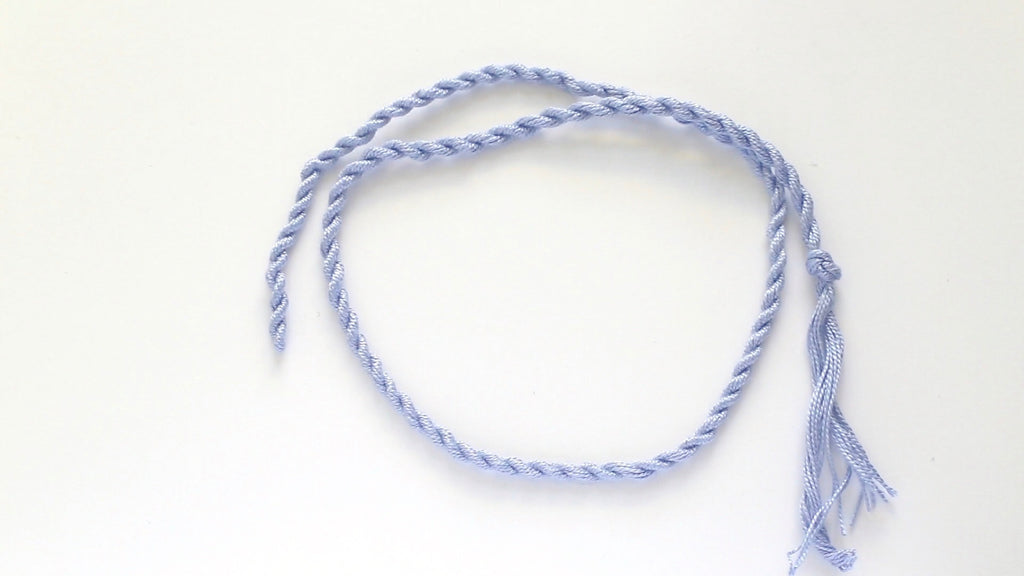
Tie one end to a straight utensil like a pen. Tie the other end onto something sturdy. The knob on a kitchen cabinet is perfect for this use! Next, begin turning the pen, twisting the lengths of floss. Twist, twist, twist, twist, and twist. Eventually the floss will twist very tightly and little knobs will appear within the twist. The goal is to have the floss spring back on itself, twisting together. When it seems like the floss is ready ( when the floss is ready you can sort of to tell that it wants to spring back ), hold the floss at the center and simply bring both ends close together. The length will twist together from the center point, creating a cord. Massage and work out any knobs and uneven twists. Cut off the pen and kitchen knob and knot the two ends together.


11. Using two - three strands of the heavy duty thread and a curved needle stitch an invisible stitch all the way around the edge of the ornament, drawing the front and back closer together. You’re going to see the stitching (it won’t be a true invisible stitch) the goal here is just to close the gap and pull the two sides together. Leave the hole at the top of the ornament unstitched.


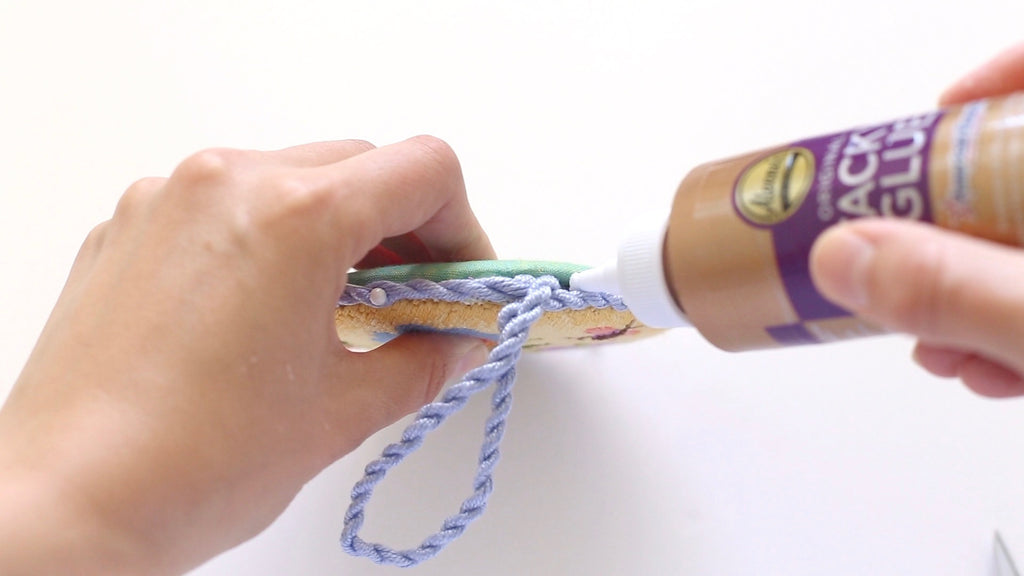
12. Push the end of the cording (the end without the knot) into the hole at the top of the ornament. Pin in place. Starting at the top, run a 3” line of tacky glue along the edge of the ornament, over the top of the invisible stitch (If you use too much glue it will squish out from underneath the cord. It will dry clear but try to avoid this). Carefully lay the the cording down on top, sinking a few pins down through the cording and into the ornament. Repeat all the way around the ornament until you get back up to the top, gluing a 1/4” past the place where the cording comes out of the ornament. Place a pin at the very top.

13. Make the loop ( I prefer the loop to be 3 inches long ). Bring the cord up at the top pin, then back down, then place a pin in the cording where the cording meets the edge of the ornament.
Work some tacky glue into the cord beyond the pin. Let it dry and then cut the cord to length (about 1/2 - 1 inch beyond the pin). Shove the end into the ornament, next to where the cording comes out. Squeeze some glue down into the ornament and let dry.

14. Using the heavy duty thread and needle, finish stitching the invisible stitch at the top of the ornament. Take a few extra stitches when you get to the top, and through the back of the loop, giving it some extra strength.
15. If the cording doesn’t completely cover the white of the canvas, you can go back with an appropriately colored marker or paint and color those areas and intersections. Nobody will notice!
Enjoy your beautiful work!

1 Response
Leave a comment
Comments will be approved before showing up.


Tiffany Brown
August 20, 2024
Abigail,
Thank you for the tutorial on finishing an ornament. I ordered your kit that finishes 3 ornaments and I am just about ready to finish my first one. Your video/pictures and detailed directions are perfect! Thank you so much for your expertise!
Tiffany